The article shows how you can add capture text functionality into your C# application. Simple demo application similar to standard TextGRAB SDK C# demo will be created. With this demo it would be possible to capture text from window, from rectangle, from point and it will also allow to capture text snapshot and text string.
Contents
Prerequisites
1. Creating your C# project
2. User interface design
3. Adding TextGRAB SDK support
4. Selection notification event handling
Conclusion
Prerequisites
TextGRAB SDK 3.1 should be installed.
1. Creating your C# project
- Launch Microsoft Visual Studio.
- Select “File\New\Project” menu.
- In the list of templates select “Visual C#\Windows\Windows From Application”.
- Type Project name “demo”
- Press OK
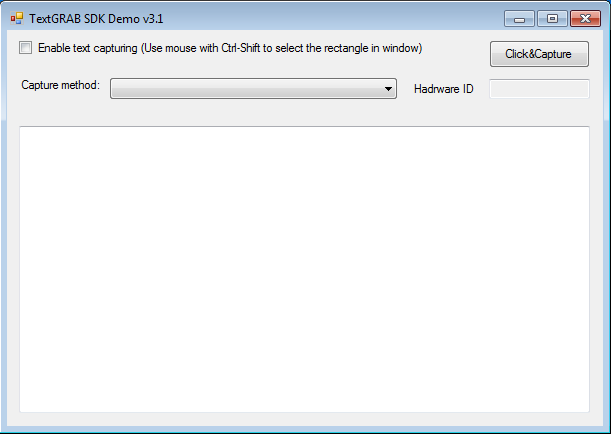
2. User interface design
Visual Studio should open Form1 designer automatically. If it haven’t opened Form1 – open it manually and place controls like shown on screenshot below. Please note that there are two controls with the same location on the form – ListView and TextBox and only one of them is visible.
Let’s also add several event handlers to our form:
– Load event for Form
– CheckedChanged for “Enable text capturing…” checkbox
– Click for “Click & Capture” button
– SelectedIndexChanged for “Capture method” combo box
You can also open Form1.Designer.cs file and change code in it in the following way:
#region Windows Form Designer generated code

/// <summary>
/// Required method for Designer support - do not modify
/// the contents of this method with the code editor.
/// </summary>
private void InitializeComponent()
{
    this.chbEnbaleCapture = new System.Windows.Forms.CheckBox();
    this.btnClickAndCapture = new System.Windows.Forms.Button();
    this.label1 = new System.Windows.Forms.Label();
    this.cbCaptureMethod = new System.Windows.Forms.ComboBox();
    this.textBox1 = new System.Windows.Forms.TextBox();
    this.listViewTxtSnapshot = new System.Windows.Forms.ListView();
    this.Rectangle = new System.Windows.Forms.ColumnHeader();
    this.HWND = new System.Windows.Forms.ColumnHeader();
    this.CapturedText = new System.Windows.Forms.ColumnHeader();
    this.Font = new System.Windows.Forms.ColumnHeader();
    this.backColor = new System.Windows.Forms.ColumnHeader();
    this.foreColor = new System.Windows.Forms.ColumnHeader();
    this.txtHWID = new System.Windows.Forms.TextBox();
    this.label2 = new System.Windows.Forms.Label();
    this.SuspendLayout();
    //
    // chbEnbaleCapture
    //
    this.chbEnbaleCapture.AutoSize = true;
    this.chbEnbaleCapture.Location = new System.Drawing.Point(12, 17);
    this.chbEnbaleCapture.Name = "chbEnbaleCapture";
    this.chbEnbaleCapture.Size = new System.Drawing.Size(413, 17);
    this.chbEnbaleCapture.TabIndex = 0;
    this.chbEnbaleCapture.Text =
    "&Enable text capturing (Use mouse with Ctrl-Shift to select the rectangle in wind" +
        "ow) ";
    this.chbEnbaleCapture.UseVisualStyleBackColor = true;
    this.chbEnbaleCapture.CheckedChanged += new System.EventHandler(this.checkBox1_CheckedChanged);
    //
    // btnClickAndCapture
    //
    this.btnClickAndCapture.Location = new System.Drawing.Point(482, 17);
    this.btnClickAndCapture.Name = "btnClickAndCapture";
    this.btnClickAndCapture.Size = new System.Drawing.Size(101, 28);
    this.btnClickAndCapture.TabIndex = 4;
    this.btnClickAndCapture.Text = "&Click&&Capture";
    this.btnClickAndCapture.UseVisualStyleBackColor = true;
    this.btnClickAndCapture.Click += new System.EventHandler(this.btnClickAndCapture_Click);
    //
    // label1
    //
    this.label1.AutoSize = true;
    this.label1.Location = new System.Drawing.Point(12, 55);
    this.label1.Name = "label1";
    this.label1.Size = new System.Drawing.Size(85, 13);
    this.label1.TabIndex = 2;
    this.label1.Text = "Capture &method:";
    //
    // cbCaptureMethod
    //
    this.cbCaptureMethod.DropDownStyle = System.Windows.Forms.ComboBoxStyle.DropDownList;
    this.cbCaptureMethod.FormattingEnabled = true;
    this.cbCaptureMethod.Location = new System.Drawing.Point(103, 55);
    this.cbCaptureMethod.Name = "cbCaptureMethod";
    this.cbCaptureMethod.Size = new System.Drawing.Size(287, 21);
    this.cbCaptureMethod.TabIndex = 3;
    this.cbCaptureMethod.SelectedIndexChanged +=
    new System.EventHandler(this.cbCaptureMethod_SelectedIndexChanged);
    //
    // textBox1
    //
    this.textBox1.Location = new System.Drawing.Point(12, 103);
    this.textBox1.Multiline = true;
    this.textBox1.Name = "textBox1";
    this.textBox1.Size = new System.Drawing.Size(571, 287);
    this.textBox1.TabIndex = 7;
    //
    // listViewTxtSnapshot
    //
    this.listViewTxtSnapshot.Columns.AddRange(new System.Windows.Forms.ColumnHeader[] {
    this.Rectangle,
    this.HWND,
    this.CapturedText,
    this.Font,
    this.backColor,
    this.foreColor});
    this.listViewTxtSnapshot.Location = new System.Drawing.Point(12, 103);
    this.listViewTxtSnapshot.Name = "listViewTxtSnapshot";
    this.listViewTxtSnapshot.Size = new System.Drawing.Size(571, 288);
    this.listViewTxtSnapshot.TabIndex = 5;
    this.listViewTxtSnapshot.UseCompatibleStateImageBehavior = false;
    this.listViewTxtSnapshot.View = System.Windows.Forms.View.Details;
    this.listViewTxtSnapshot.Visible = false;
    //
    // Rectangle
    //
    this.Rectangle.Text = "Screen Rectangle";
    this.Rectangle.Width = 104;
    //
    // HWND
    //
    this.HWND.Text = "HWND";
    this.HWND.Width = 53;
    //
    // CapturedText
    //
    this.CapturedText.Text = "Captured Text";
    this.CapturedText.Width = 161;
    //
    // Font
    //
    this.Font.Text = "Font";
    this.Font.Width = 80;
    //
    // backColor
    //
    this.backColor.Text = "Background Color";
    this.backColor.Width = 80;
    //
    // foreColor
    //
    this.foreColor.Text = "Foreground color";
    this.foreColor.Width = 87;
    //
    // txtHWID
    //
    this.txtHWID.Location = new System.Drawing.Point(482, 56);
    this.txtHWID.Name = "txtHWID";
    this.txtHWID.ReadOnly = true;
    this.txtHWID.Size = new System.Drawing.Size(101, 20);
    this.txtHWID.TabIndex = 6;
    //
    // label2
    //
    this.label2.AutoSize = true;
    this.label2.Location = new System.Drawing.Point(404, 59);
    this.label2.Name = "label2";
    this.label2.Size = new System.Drawing.Size(67, 13);
    this.label2.TabIndex = 5;
    this.label2.Text = "&Hadrware ID";
    //
    // Form1
    //
    this.AutoScaleDimensions = new System.Drawing.SizeF(6F, 13F);
    this.AutoScaleMode = System.Windows.Forms.AutoScaleMode.Font;
    this.ClientSize = new System.Drawing.Size(595, 402);
    this.Controls.Add(this.label2);
    this.Controls.Add(this.txtHWID);
    this.Controls.Add(this.listViewTxtSnapshot);
    this.Controls.Add(this.cbCaptureMethod);
    this.Controls.Add(this.label1);
    this.Controls.Add(this.btnClickAndCapture);
    this.Controls.Add(this.textBox1);
    this.Controls.Add(this.chbEnbaleCapture);
    this.Name = "Form1";
    this.Text = "TextGRAB SDK Demo v3.1";
    this.Load += new System.EventHandler(this.Form1_Load);
    this.ResumeLayout(false);
    this.PerformLayout();

}

#endregion

private System.Windows.Forms.CheckBox chbEnbaleCapture;
private System.Windows.Forms.Button btnClickAndCapture;
private System.Windows.Forms.Label label1;
private System.Windows.Forms.ComboBox cbCaptureMethod;
private System.Windows.Forms.TextBox textBox1;
private System.Windows.Forms.ListView listViewTxtSnapshot;
private System.Windows.Forms.ColumnHeader Rectangle;
private System.Windows.Forms.ColumnHeader HWND;
private System.Windows.Forms.ColumnHeader CapturedText;
private System.Windows.Forms.ColumnHeader Font;
private System.Windows.Forms.ColumnHeader backColor;
private System.Windows.Forms.ColumnHeader foreColor;
private System.Windows.Forms.TextBox txtHWID;
private System.Windows.Forms.Label label2;
Also don’t forget to declare event handlers in Form1.cs, so you class will look like this:
public partial class Form1 : Form
    {
        public Form1()
        {
            InitializeComponent();
        }

        private void Form1_Load( object sender, EventArgs e )
        {

        }

        private void chbEnbaleCapture_CheckedChanged( object sender, EventArgs e )
        {

        }

        private void btnClickAndCapture_Click( object sender, EventArgs e )
        {

        }

        private void cbCaptureMethod_SelectedIndexChanged( object sender, EventArgs e )
        {

        }
    }
Now we want to add an ability to select different capture methods. Sure, we can do this by just inserting text strings to our combobobx and than identifying capture selected capture method by selection index, but C# allows a better way of doing this. Let’s add CaptureMethod class declaration at the end of Form1.cs file. This class will represent capture method. Here is the code, which you need to add to the end of Form1.cs file:
/// <summary>
/// Generic capture method class.
/// </summary>
public class CaptureMethod
{
    public CaptureMethod( string message ) { message_ = message; }
    public override string ToString()
    {
        return message_;
    }
    private string message_;
}

/// <summary>
/// Method for capturing from rectangle.
/// </summary>
public class CaptureMethodRect : CaptureMethod
{
    public CaptureMethodRect( string message ) : base( message ) { }
};

/// <summary>
/// Method for capturing from window.
/// </summary>
public class CaptureMethodWindow : CaptureMethod
{
    public CaptureMethodWindow( string message ) : base( message ) { }
};

/// <summary>
/// Method for capturing text string.
/// </summary>
public class CaptureMethodString : CaptureMethod
{
    public CaptureMethodString( string message ) : base( message ) { }
};

/// <summary>
/// Method for capturing text snapshot.
/// </summary>
public class CaptureMethodTextSnapshot : CaptureMethod
{
    public CaptureMethodTextSnapshot( string message ) : base( message ) { }
};
When this is done – we can easily add an array of capture methods as a member of Form1 class as follows:
// Available capture methods.
CaptureMethod[] captureMethods = new CaptureMethod[] {
new CaptureMethodRect("Rectangle (Select rectangle in window)"),
new CaptureMethodString("String text from window(Just click on text)"),
new CaptureMethodTextSnapshot("Text snapshot from window(Just click on window)"),
new CaptureMethodWindow("Window (Just click on window)")
};
Now we are ready do add combo box initialization to form Load event handler. We can do this by adding this code to the end of Form1_Load event handler:
// Initialize capture methods and set default method.
foreach( CaptureMethod method in captureMethods )
{
cbCaptureMethod.Items.Add( method );
}
cbCaptureMethod.SelectedIndex = 0;
Let’s also add following code to Form1_Load. First line disables “Click & Capture” button since capturing is disabled and the second hides text snasphot list view control because default selection method returns plain text and not text snapshot:
btnClickAndCapture.Enabled = chbEnbaleCapture.Checked;
listViewTxtSnapshot.Hide();
The last thing we need to do here – is to change SelectedIndexChanged event handler. When selection changes – we need to analyze newly selected method and if it is text snapshot capture method – we must show list view control and hide text box and if not – list view must be hidden and text box must be shown. The implementaion can look like this:
if( cbCaptureMethod.SelectedItem is CaptureMethod )
{
bool bShow = cbCaptureMethod.SelectedItem is CaptureMethodTextSnapshot;
listViewTxtSnapshot.Visible = bShow;
textBox1.Visible = !bShow;
}
3. Adding TextGRAB SDK support
First of all – you need to add TextGRAB SDK to the project references section. Right click on “References” in solution explorer. Select “Add Reference”, Go to COM tab, select “TextGRAB SDK 3.1 Type Library” and press OK.
Now we will add wrapper class which will help us a bit with SDK initialization. Add TextGrabber.cs to your solution and write class implementation in a following way:
using System;
using System.Collections.Generic;
using System.Linq;
using System.Text;
using System.Windows.Forms;
using System.Runtime.InteropServices;

namespace demo
{
    // Selection notification handler delegate.
    public delegate void OnSelectionEventHandler();

    public class TextGrabber : System.Windows.Forms.NativeWindow
    {
        const int WM_SELECTION = 2048;  // TextGRAB SDK selection notification message.

        private TextGRABSDKLib.ITextGRABSDK _textGRABCore;  // Holds SDK instance.

        // Selection notification event.
        public event OnSelectionEventHandler OnSelectionComplete;

        /// <summary>
        /// Helper method to set SDK license.
        /// </summary>
        /// <param name="user">User name.</param>
        /// <param name="key">registration key.</param>
        /// <returns>true on success, false otherwise.</returns>
        public bool SetupLicense( string user, string key )
        {
            bool bOk = true;
            try
            {
                // Try to set license.
                _textGRABCore.SetLicense( user, key );
            }
            catch( COMException exc )
            {
                // License was not set.
                bOk = false;
            }
            return bOk;
        }

        /// <summary>
        /// Class constructor.
        /// Subclasses base window, initializes SDK
        /// and registers selection notification window.
        /// </summary>
        /// <param name="handle">Window handle.</param>
        public TextGrabber( IntPtr handle )
        {
            base.AssignHandle( handle );
            _textGRABCore = new TextGRABSDKLib.TextGRABSDK();
            SetupLicense( "", "" ); // You can set your user name and registration key here.
            _textGRABCore.RegisterSelectionNotify( handle.ToInt32() );
        }

        /// <summary>
        /// Override window procedure to handle selection notifications.
        /// </summary>
        /// <param name="m">Windows message.</param>
        protected override void WndProc( ref Message m )
        {
            // Check message type.
            if( m.Msg == WM_SELECTION )
            {
                // Raise selection notification event.
                if( OnSelectionComplete != null )
                {
                    OnSelectionComplete();
                }
            }
            // Process other messages.
            base.WndProc( ref m );
        }

        /// <summary>
        /// Accessor property for TextGRAB SDK instance.
        /// </summary>
        public TextGRABSDKLib.ITextGRABSDK Grabber
        {
            get
            {
                return _textGRABCore;
            }
        }
    }
}
Now we need to add this class as a member of Form1 class:
TextGrabber tg; // Text grabber instance.
When user decides to enable or disable text grabber – this can be done with the “Enable text capturing…” check box. So we need to change chbEnbaleCapture_CheckedChanged event handler to enable this functionality:
// Enable/disable text grabber and "Click&Capture" button.
tg.Grabber.EnableSelection( chbEnbaleCapture.Checked );
btnClickAndCapture.Enabled = chbEnbaleCapture.Checked;
SDK will be initialized when form is loaded. Also when loading the form – we will obtain hardware ID information from SDK and also trial information ( total trial period days count and trial remaining days count). To achieve this – following code should be added to Form1_Load:
// Initialize TextGRAB SDK.
tg = new TextGrabber( this.Handle );

// Get hardware ID.
string hwid;
tg.Grabber.GetHardwareID( out hwid );
txtHWID.Text = hwid;

// Get and display trial information.
int iTotal = 0; ;
int iLeft = 0;
tg.Grabber.GetTrialInfo( out iTotal, out iLeft );
if( iTotal != 0 || iLeft != 0 )
{
string strTrial = String.Format(
" Trial, {0:d} day(s) left from {1:d}", iLeft, iTotal );
this.Text += strTrial;
}
The last thing to do in this section – is to change “Click&Capture” button Click event handler so it will force TextGRAB SDK internal selection tool:
tg.Grabber.ForceStartSelection( true );
4. Selection notification event handling
First of all we need to add selection handler method to Form1 class. This can be done with adding following code to the end of Form1 class implementation:
public void OnSelectionCompleteAction()
{
}
Also following code should be added to Form1_Load to enable slection notification handling:
// Selection notification handling.
tg.OnSelectionComplete += new OnSelectionEventHandler( OnSelectionCompleteAction );
When handling selection notification we need to check capture method and than capture text or text snapshot with the selected method. So the implementation can be done in the following way:
TextGRABSDKLib.tagRECT rect = new TextGRABSDKLib.tagRECT();
int hwnd;
string txt = string.Empty;
int index = -1;

// Get selection.
tg.Grabber.GetSelection( out hwnd, out rect );

// Check capture method.
if( cbCaptureMethod.SelectedItem is CaptureMethodRect )
{
    tg.Grabber.CaptureFromSelection( hwnd, ref rect, out txt );
}
else if( cbCaptureMethod.SelectedItem is CaptureMethodWindow )
{
    tg.Grabber.CaptureFromHWND( hwnd, out txt );
}
else if( cbCaptureMethod.SelectedItem is CaptureMethodString )
{
    tg.Grabber.CaptureString( hwnd, rect.left, rect.top, out txt, out index );
}
else if( cbCaptureMethod.SelectedItem is CaptureMethodTextSnapshot )
{
   TextGRABSDKLib.TextSnapshot txtSnapshot = null;
   listViewTxtSnapshot.Items.Clear();

   tg.Grabber.CaptureTextSnapshot( hwnd, out txtSnapshot );

   // Add snapshot items to list view.
   foreach( TextGRABSDKLib.TextItem txtItem in txtSnapshot )
   {
       // Format item bounds.
       string bounds = string.Format( "[{0},{1},{2},{3}]",
           txtItem.Bounds.left.ToString(),
           txtItem.Bounds.top.ToString(),
           txtItem.Bounds.right.ToString(),
           txtItem.Bounds.bottom.ToString() );

       // Create list view item.
       ListViewItem item = new ListViewItem( bounds );
       item.SubItems.Add( txtItem.Window.ToString() );
       item.SubItems.Add( txtItem.text );
       item.SubItems.Add( txtItem.TextFont.FaceName );
       item.SubItems.Add( txtItem.BackColor.ToString() );
       item.SubItems.Add( txtItem.ForeColor.ToString() );

       // Add new list view item.
       listViewTxtSnapshot.Items.Add( item );
   }
}

// Set captured text.
textBox1.Text = txt;
Conclusion
If you followed all instructions from the article – your C# demo is finished, you can run it and see how it works. You can use this demo as a basic application for your own C# projects which need to capture text from other applications.
Download C# text capture demo source code.
If you have any questions – please feel free to contact us.